I Broke My Valentine’s Leg

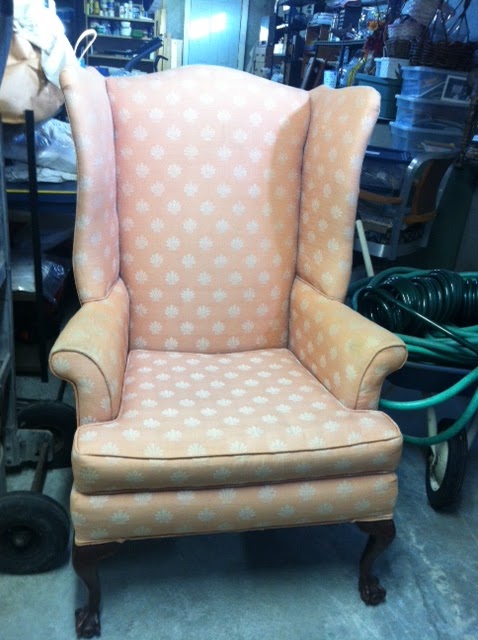
Yes, it was a violent encounter, on-lookers were horrified.  Did I mention that my valentine was the wing chair I am working on restoring? I was not going to miss my upholstery class for a half-baked holiday that makes couples force romance and singles force smiles.  So yes, I spent Valentine’s Day upholstering. Well, there was no actual upholstering; I was trying to salvage my relationship with my valentine.

I started class by loosening all the joints of my chair so that I could glue them back together to be sure my chair would be a steady one.  After applying wood glue I put my chair in traction with large, heavy metal clamps so that the joints stayed tight as the glue dried.  As I was tightening one of the clamps that ran from the bottom of the rear left leg up to the top of the chair’s back I heard a loud CRACK! The leg of my chair had snapped right off, but it was not a clean break.  I gasped, then whispered to my chair “It’s not you, it’s me.”
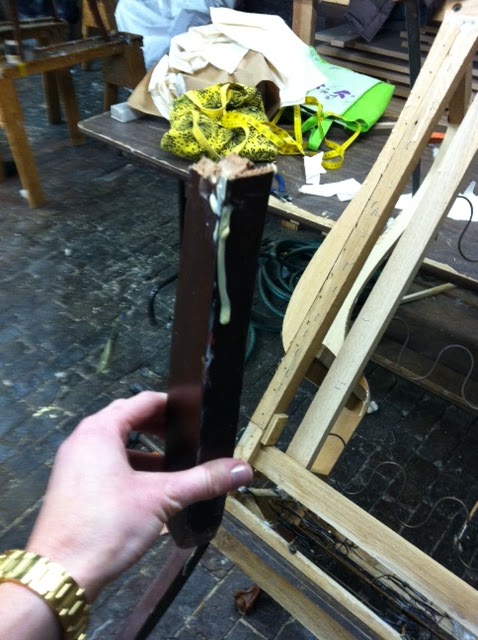
My chair’s broken leg
Maybe I should have seen this coming, friends told me he would never amount to anything, but I saw something in my chair that I had not seen in others.
I was emotional and heartbroken as I held his leg in my hand.  Heartbroken that a relationship that had started out so promising — and one in which I saw so much potential for the future — was irrevocably broken, snapped in two pieces with painfully jagged edges exposed.  We had a deep connection my chair and I.  We were compatible on so many levels.  Sure, I wanted to change him, but it was for his own good.  I could see his potential.
My teacher assured me that all was not lost. There was hope. It would take hard work (and a plethora of wood glue) but we could get this chair back on track and we would still have years of happy reclining to look forward to. I pulled myself together and squeezed glue all over the breaking point as if it was my only hope for a happy ending. I stuck the broken leg back in place, used some staples just to be sure, and carefully, reapplied the clamp.  It was touch-and-go there for a minute, and I will not know for sure if we have a chance until I return to class next week.  But I am hopeless romantic, and I think this may be it!
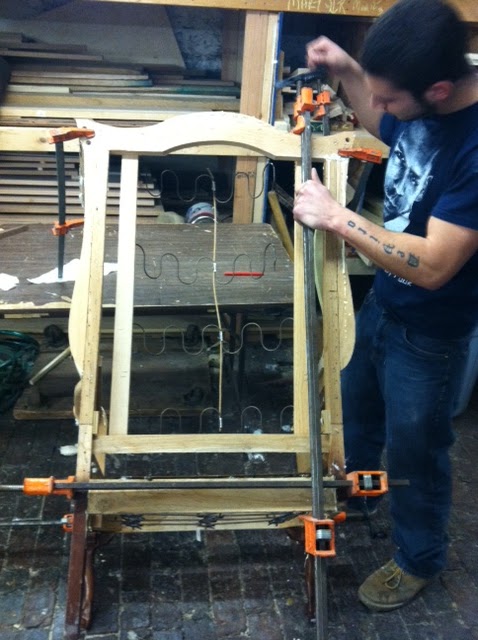
Reapplying the clamp after the breakup
If only all relationships could be fixed with wood glue and some clamps…

Happy Valentine’s Day everyone!

Back At It

Those of you have been reading this blog for a while know that one of my first endeavors was upholstery, and I really fell in love!  I may have actually found my passion on one of my first tries!  It combines the physical challenge of breaking down a chair to build it back up, with the creative challenge of choosing fabric, piping and just how cushiony you want your chair (A very important questions as I have discovered). It is the ultimate form of recycling: giving a tied old chair with great bones, a brand new look and a new life.
This chair has great bones, but this fabric is terrible
After bringing one of my grandmother’s piano benches, and an ottoman back to life, I have begun my next class at the Eliot School of Art with a very challenging project: a wing chair.  I found the wing chair on ebay for $99 for a set of two (amazing deal), and I found some gorgeous Hinson & Company fabric at Griswold’s fabric outlet (a treasure trove of designer fabric at deep discount) and hauled it all to Jamaica Plain this past week.
It took over three hours to break down this chair and it was not easy (I have cuts all over my hands to prove it). I pulled out hundreds of stables, yanked the ugly, worn, peachy fabric to shreds and battled some very old, rusty springs.  At one point I was standing on the naked frame of my soon-to-be-beautiful chair pulling at a tiny strip of fabric as if a mugger just stole my purse.
Hinson & Company Fabric
My teacher tells me that it could take me several months’ worth of classes to finish this chair, and I will have to get very comfortable with a sewing machine.  As a result, you won’t get as many updates this time around, and I won’t get the sort of instant gratification that I received from my smaller projects last spring.  But I promise to post tons of pictures of the final product!
My naked chair
Until then I will be hard at work creating my dream chair! And those of you who have asked if I take custom orders, this project should get me to a level where I can reupholster your furniture without losing any limbs (both mine and your chairs’)!

Hitting the Nail on the Head

I have made some serious progress on my little bench!  I didn’t post after last week’s class because I had a run-in with a can of wood stain and had no pictures to share.  Let me catch you up: I sanded my bench to get rid of all the little nicks and scrapes it has suffered through over the last 60 some odd years. I learned how to use a power sander, which provides a work-out that I would imagine to be close to that of a shake weight (note: I have no experience with the latter). Then I started re-staining it…and that’s where the trouble began.  My teacher, Paul, gave me clear plastic gloves to keep my hands clean as I applied the stain to the bench with a large wad of cotton (this raw, fluffy cotton is used to cushion pieces of furniture).  I took the gloves off in between staining and wiping the excess stain off.  But when I put the gloved back on I put them on inside out…so stain was caked in every cranny and crevice of my hands.  Hence no pictures.

After a good scrubbing with paint thinner (followed by a great deal of moisturizer) I was back in action last night getting acquainted with some new (or at least new to me) tools.  I did a lot of work with a magnetic hammer (in an effort to get the cushion on my seat in place and ready for fabric) and I now feel that ALL hammers should be magnetic.  Seriously, no one would ever hit their finger again.  My teacher had quite a technique, and kids, don’t try this at home, he put at least 10 #4 tacks in his mouth and when he was ready for a new one would stick a tack half way out of his lips, bring the hammer close to it so it would magnetically stick to the hammer then he would drive it into the base of the bench that will support my cushion.  He was really like a squirrel with nuts, except his nuts were sharp and dangerous.  He said he has swallowed three in his upholstery career. I tried this technique once, but got nervous and spontaneously gagged and nearly swallowed the tack.  I decided to leave the stunts to the experts.  Paul even told me that upholstery tacks are sanitized because experienced upholsterers always use their mouth as a staging ground.  

So this week I got the seat of the bench prepped with foam, cotton and next week will be fabric time!  I am also looking for my next project…a chair that has springs, but that is not so complicated that it will take a year for me to upholster.  If you have a chair with a medium amount of upholstered surfaces that you would like to become my next masterpiece send me a picture!

Strip It Down

@font-face { font-family: “Times New Roman”;}p.MsoNormal, li.MsoNormal, div.MsoNormal { margin: 0in 0in 0.0001pt; font-size: 12pt; font-family: “Times New Roman”; }p { margin-right: 0in; margin-left: 0in; font-size: 10pt; font-family: Times; }table.MsoNormalTable { font-size: 10pt; font-family: “Times New Roman”; }div.Section1 { page: Section1; }

The few, the proud, no, not the Marines — my blog followers!  I am sorry I have been so derelict as of late, but I am back and I have some amazing adventures in the pipeline.  I have been exploring lots of options that would allow me to dip my toes into the world of interior design. But then I decided to go big or go home: instead of just dipping my toes, I am rolling up my sleeves and getting my hands dirty – or more accurately gluey.
@font-face { font-family: “Times New Roman”;}p.MsoNormal, li.MsoNormal, div.MsoNormal { margin: 0in 0in 0.0001pt; font-size: 12pt; font-family: “Times New Roman”; }a:link, span.MsoHyperlink { color: blue; text-decoration: underline; }a:visited, span.MsoHyperlinkFollowed { color: purple; text-decoration: underline; }p { margin-right: 0in; margin-left: 0in; font-size: 10pt; font-family: Times; }table.MsoNormalTable { font-size: 10pt; font-family: “Times New Roman”; }div.Section1 { page: Section1; }

I have enrolled in an upholstery class at the Eliot School of Fine and Applied Arts.  For the sake of progress — not to mention my crafty bravado — I chose a simple item as my first project: a piano bench with an upholstered top.  It had been my grandmother and my great aunt needlepointed the cushion.  I marched it into the Eliot School one a snowy night and three hours later my wee bench was in traction – literally.

 @font-face { font-family: “Times New Roman”;}p.MsoNormal, li.MsoNormal, div.MsoNormal { margin: 0in 0in 0.0001pt; font-size: 12pt; font-family: “Times New Roman”; }p { margin-right: 0in; margin-left: 0in; font-size: 10pt; font-family: Times; }table.MsoNormalTable { font-size: 10pt; font-family: “Times New Roman”; }div.Section1 { page: SectionWhat I have discovered about upholstering is that first you have to un-upholster an item, and for that anything goes.  A wrench, a screwdriver, a mallet…prying, ripping and wrestling – I utilized all of these trying to turn my bench cushion into well, nothing.  Even if you are working on a more complicated project (say a wing chair – more about that later) you still have to strip it down to build it back up.  When the only thing left was the bench frame we took that apart as well.  I secured the bench’s joints with screws and glue.  Glue seems to do most of the work so it is important to get it all over the joins of the furniture; hence it got all over me.
@font-face { font-family: “Times New Roman”;}p.MsoNormal, li.MsoNormal, div.MsoNormal { margin: 0in 0in 0.0001pt; font-size: 12pt; font-family: “Times New Roman”; }p { margin-right: 0in; margin-left: 0in; font-size: 10pt; font-family: Times; }table.MsoNormalTable { font-size: 10pt; font-family: “Times New Roman”; }div.Section1 { page: Section1; }
After applying the glue to the bench (and myself) I secured the bench from every angle with large, heavy clamps, which is how I left it until next week when I will sand and stain my little bench.  

With my first class behind me, I can already say that I really enjoy this.  It’s active (you really have to use some muscle) and creative (I have picked out the most gorgeous blue ikat fabric for the top and I am toying with the idea of hot pink piping).  If not my passion, this could certainly turn out to be a new hobby! 

I will have another update after next week’s class.  Today a piano bench – tomorrow the world!